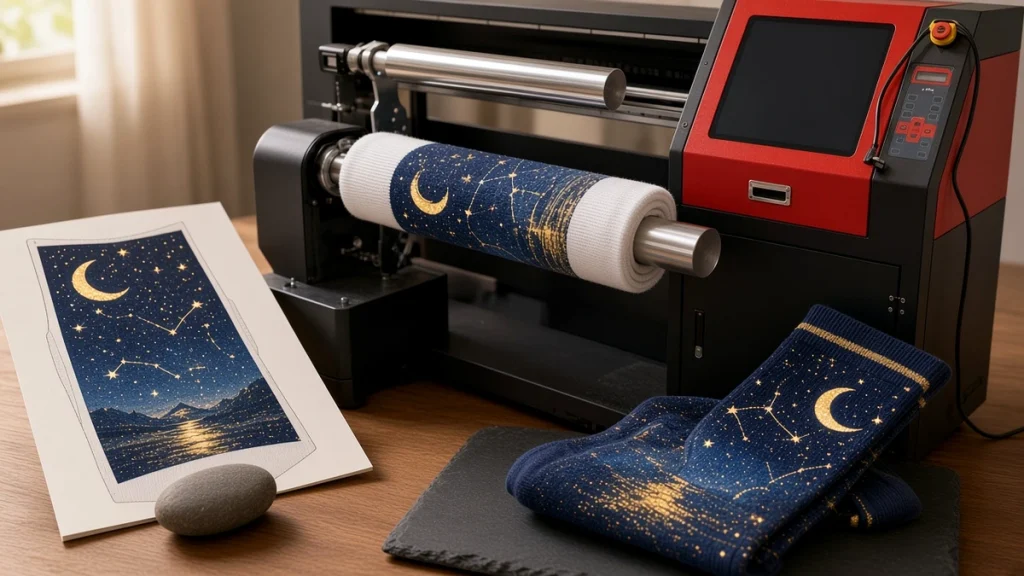
Most people who see a socks printer for the first time are surprised by how simple it looks: a sock slides onto a roller, the roller spins, the carriage moves, and a few minutes later a fully printed sock comes off. Behind that simplicity is a sequence of steps that all have to work together. Understanding them makes it much easier to plan production, train operators and troubleshoot problems.
Here is what happens to a single pair, from file to finished product.
Step 1: Artwork on a template
Every job starts with a design placed on a sock template. The template represents the sock as it will sit on the roller: a long rectangle whose width equals the circumference of the stretched sock. Designers place the artwork so that the left and right edges meet cleanly, because those edges will touch once the print wraps around the tube.
Good templates also mark the cuff, heel and toe zones. Even though the sock is printed as a tube, the heel and toe areas stretch differently when worn, so placing faces or logos away from those zones gives a better result. Our guide to preparing artwork for a socks printer explains templates in detail.
Step 2: RIP and color processing
The design file then passes through RIP software. The RIP converts the image into the dot patterns each printhead will fire, applies the color profile for your ink and fabric, and sets parameters such as resolution and number of passes. This is where consistent color is won or lost, so it is worth reading up on socks printer color management.
Step 3: Loading the sock
An operator pulls the blank sock over the roller, smoothing it so the fabric is evenly stretched and the knit lines run straight. Uneven loading is one of the most common causes of distorted prints, so training here pays off quickly. Roller diameter must suit the sock size: too small and the fabric sags; too large and the knit opens up, showing white between the loops after the sock relaxes.
On multi-roller machines the operator loads the next sock while another roller is printing. That overlap is the main reason four-roller and twin-roller models achieve higher output than single-roller designs.
Step 4: Printing in the round
When printing starts, the roller rotates under the printheads while the carriage travels along its length. Ink lands on the sock as a continuous spiral or band, building up the full image around the circumference. Because the sock is printed as a tube, there is no side seam line in the artwork. This is the defining feature of a rotary socks printer.
Print time depends on sock length, resolution and the number of passes. Published reference outputs for Ningbo Colorido models range from compact desktop machines suited to small batches up to four-roller units designed for continuous production; the model comparison lists the figures for each.
Step 5: Fixation
Freshly printed ink sits on and between the fibers but is not yet permanent. It has to be fixed:
- Polyester socks printed with disperse ink are heated in an oven so the dye moves into the fiber. A conveyor-chain unit such as the COHE-1801 sock heating oven keeps this step continuous.
- Cotton socks printed with reactive ink are fixed with steam or a low-temperature oven, which lets the dye bond chemically with the cellulose.
Skipping or rushing fixation leads to weak colors and dye that bleeds in the first wash.
Step 6: Washing and drying (cotton route)
Reactive-printed cotton socks are washed after fixation to remove unfixed dye and pretreatment chemicals, then dewatered in a spin dryer and tumble dried. Polyester socks usually skip washing, which is one reason polyester is popular for fast print-on-demand work.
Step 7: Inspection and packing
Finally each pair is checked for color accuracy, alignment and defects, then paired, labeled and packed. Many businesses photograph the finished pair at this stage for their online listings.
Where bottlenecks usually appear
New owners often focus on printing speed, but in practice the bottleneck is frequently elsewhere: loading technique, oven capacity, or drying time on the cotton route. When planning a line, size every step to the same daily target. Our article on planning a production line around your socks printer gives a practical method.
Putting it together
A socks printer workflow is simple once you see it as a chain: template, RIP, loading, printing, fixation, washing and drying, inspection. Each link has a clear job, and each can be improved independently. If you would like to see the full process running, the production process page and our video center show real machines at work, or you can ask our team for a line recommendation.
Where time goes in a typical run
Operators new to a socks printer are often surprised that printing itself is rarely the slowest step. Loading socks evenly onto rollers, unloading them without smudging, and moving batches through fixation take more hands-on time than the print pass. Watching a full shift and noting how long each stage takes is the simplest way to find where your own bottleneck is. The production process page shows how the steps connect in practice.
Leave A Comment